Everything is now ready for the tenant to rent the charging station using the QR code.
# Rent a charging stationHere you will find instructions on how to onboard at a charging station via ImmoConnect.
First, scan the QR code at the charging station with your smartphone camera. This page should now open. Click on "Use via Immoconnect" and then on "Continue" at the bottom. [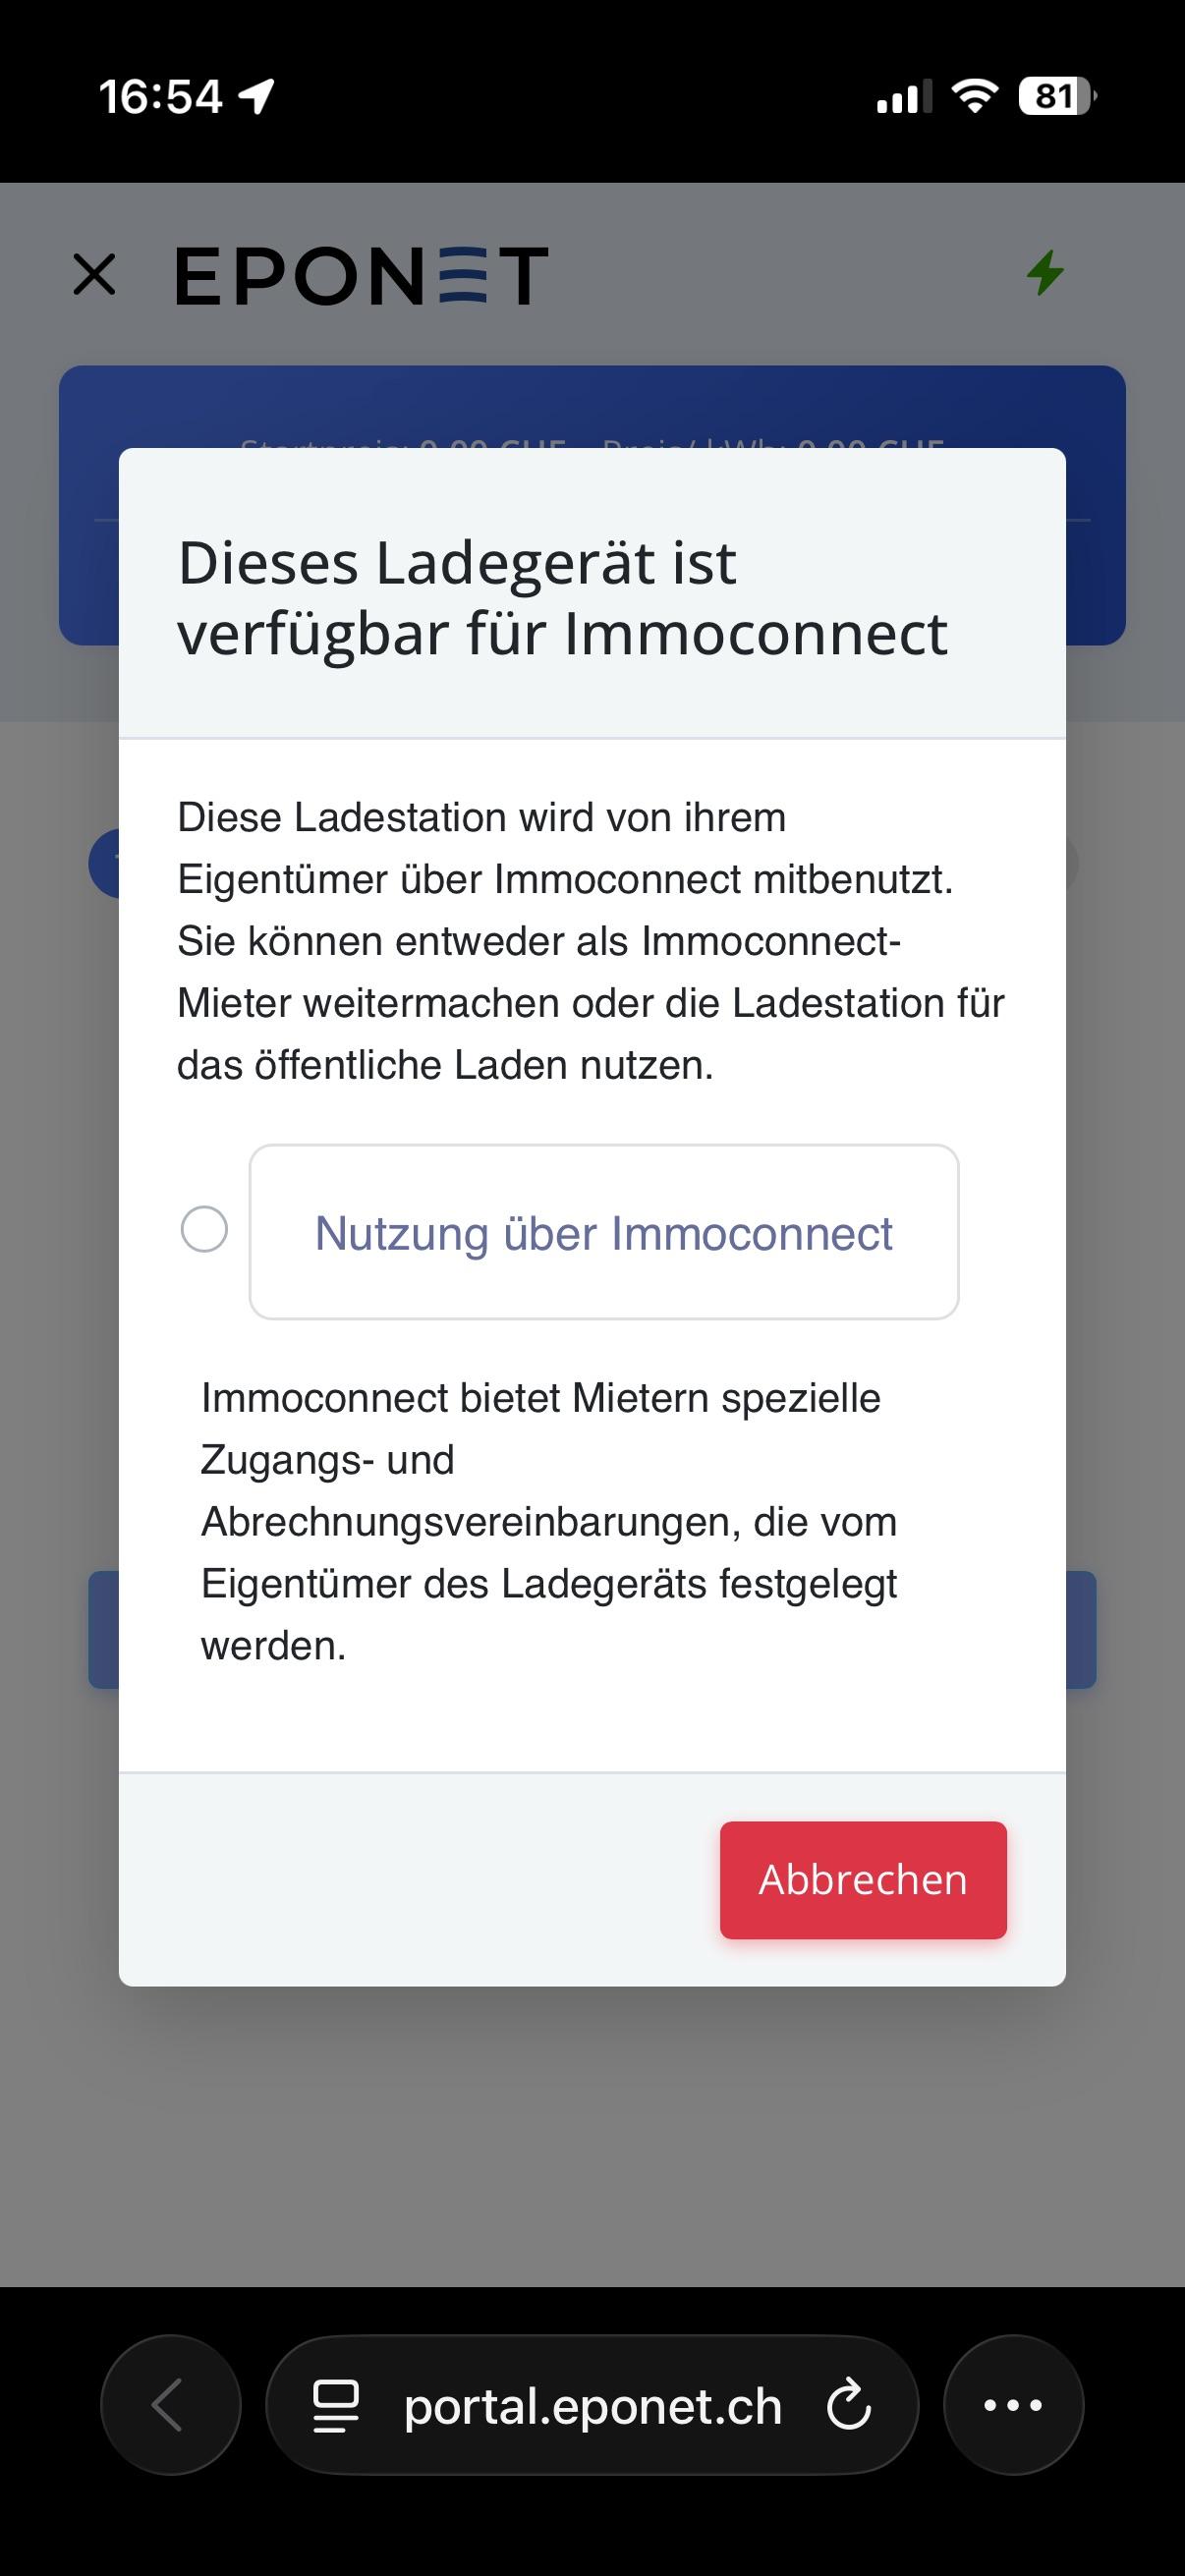](https://wiki.eponet.ch/uploads/images/gallery/2025-12/b2306a48-6d3e-477a-a692-5c842a51bce3-1-101-o.jpeg) You can now log in with your Eponet account. [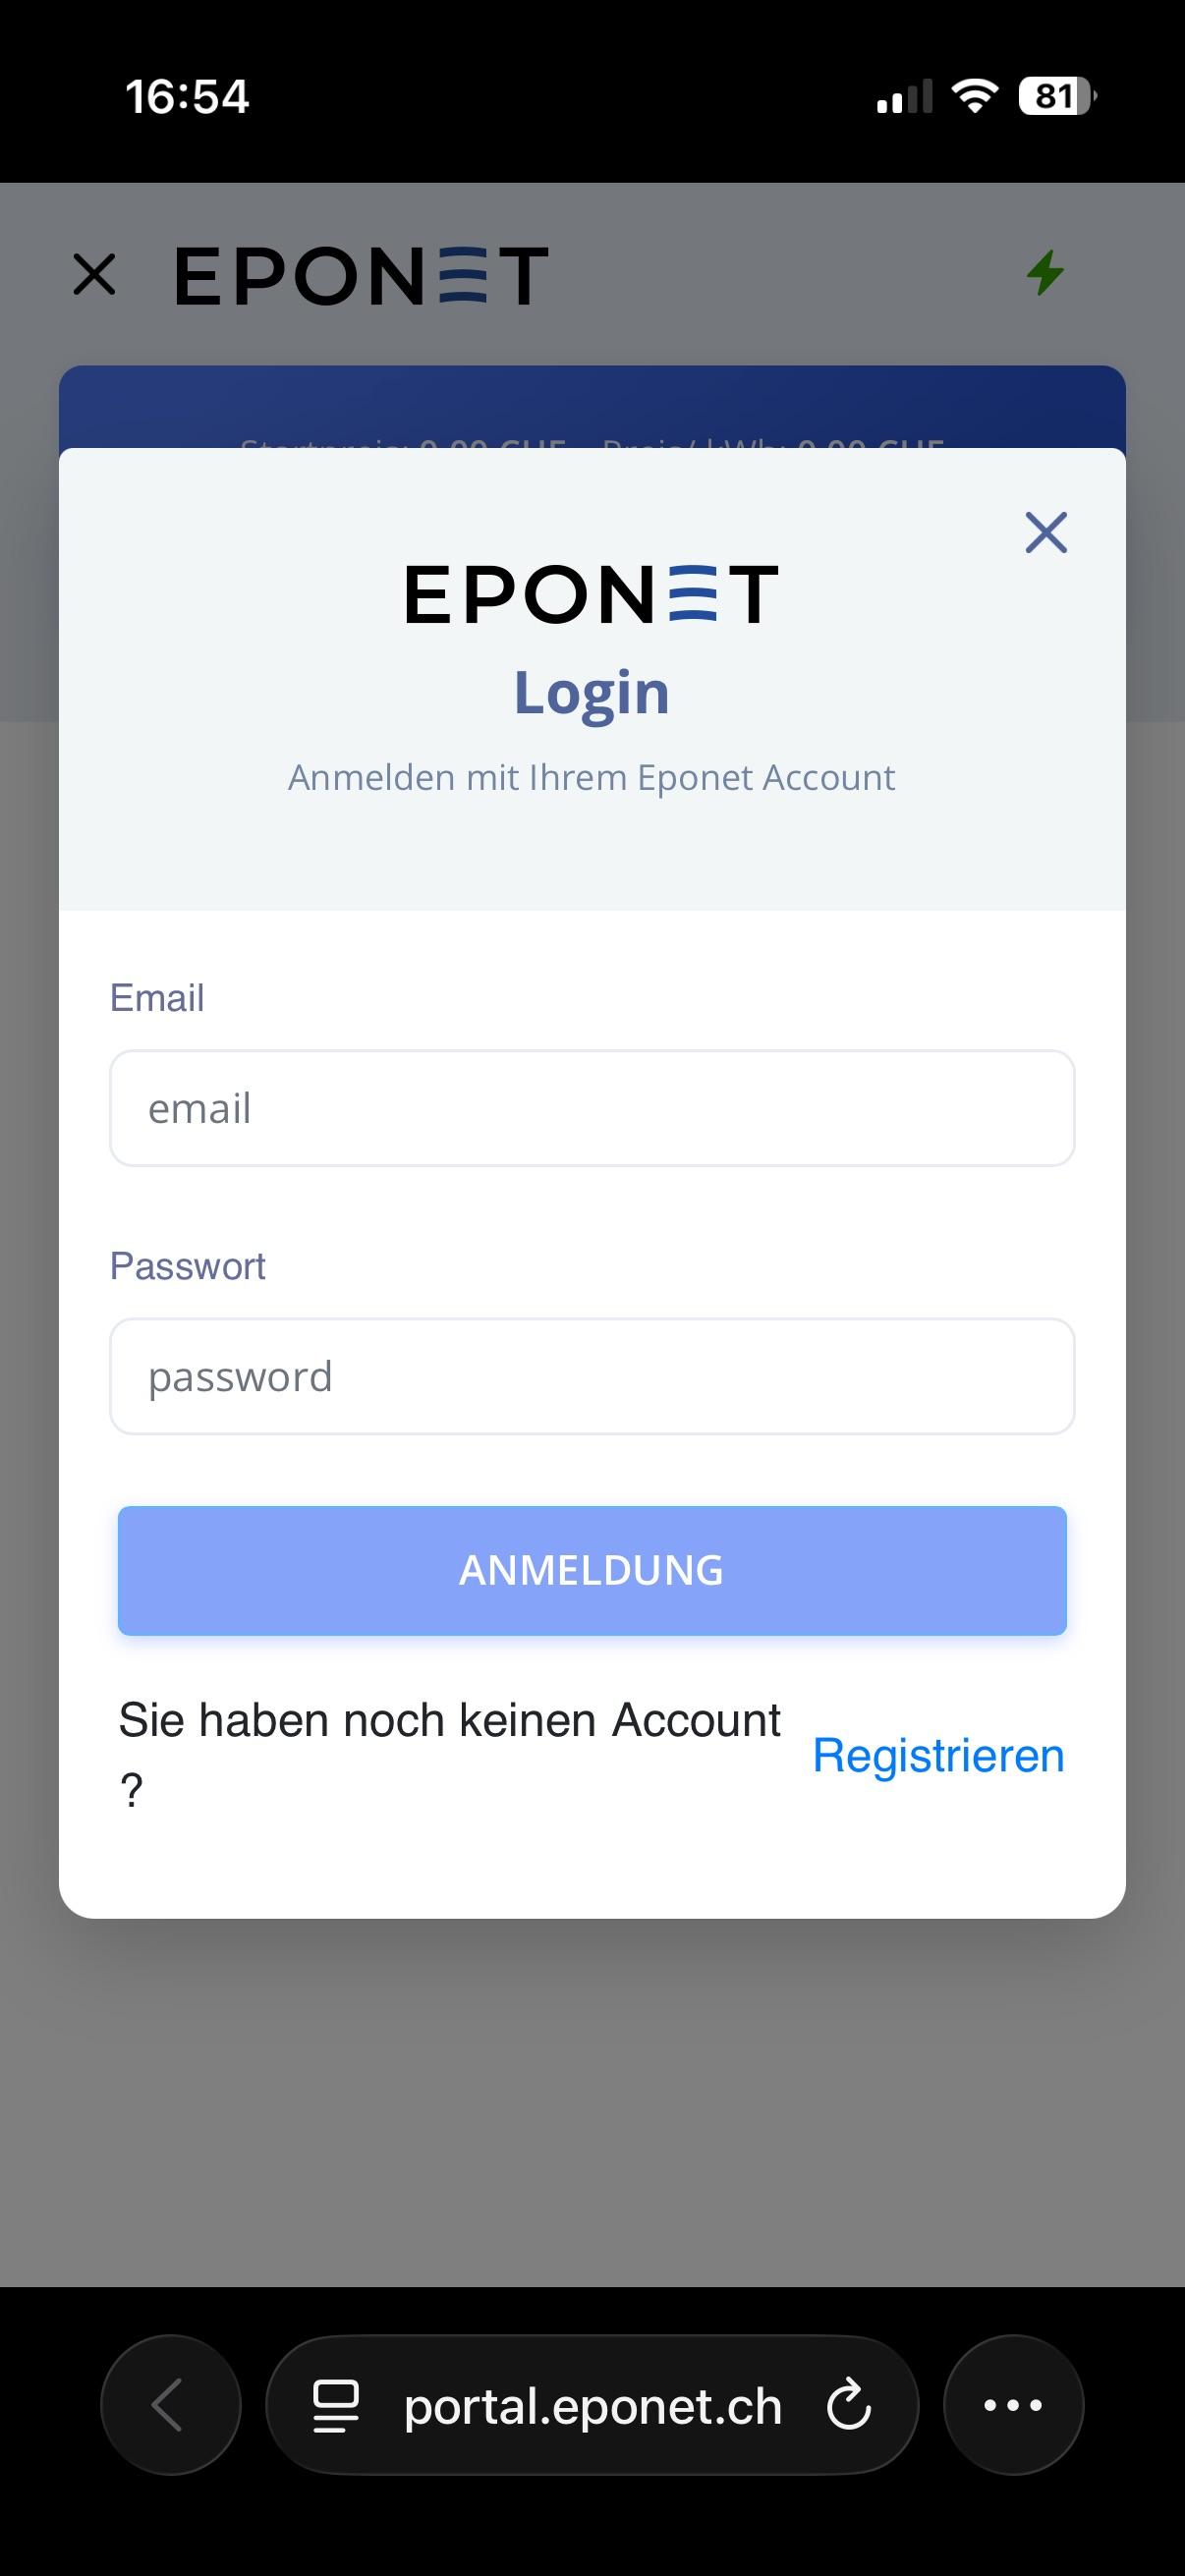](https://wiki.eponet.ch/uploads/images/gallery/2025-12/c61f698f-aa78-4926-9aac-5e428dfb4299-1-101-o.jpeg) Once you have successfully logged in, you will find the terms and conditions on this page. [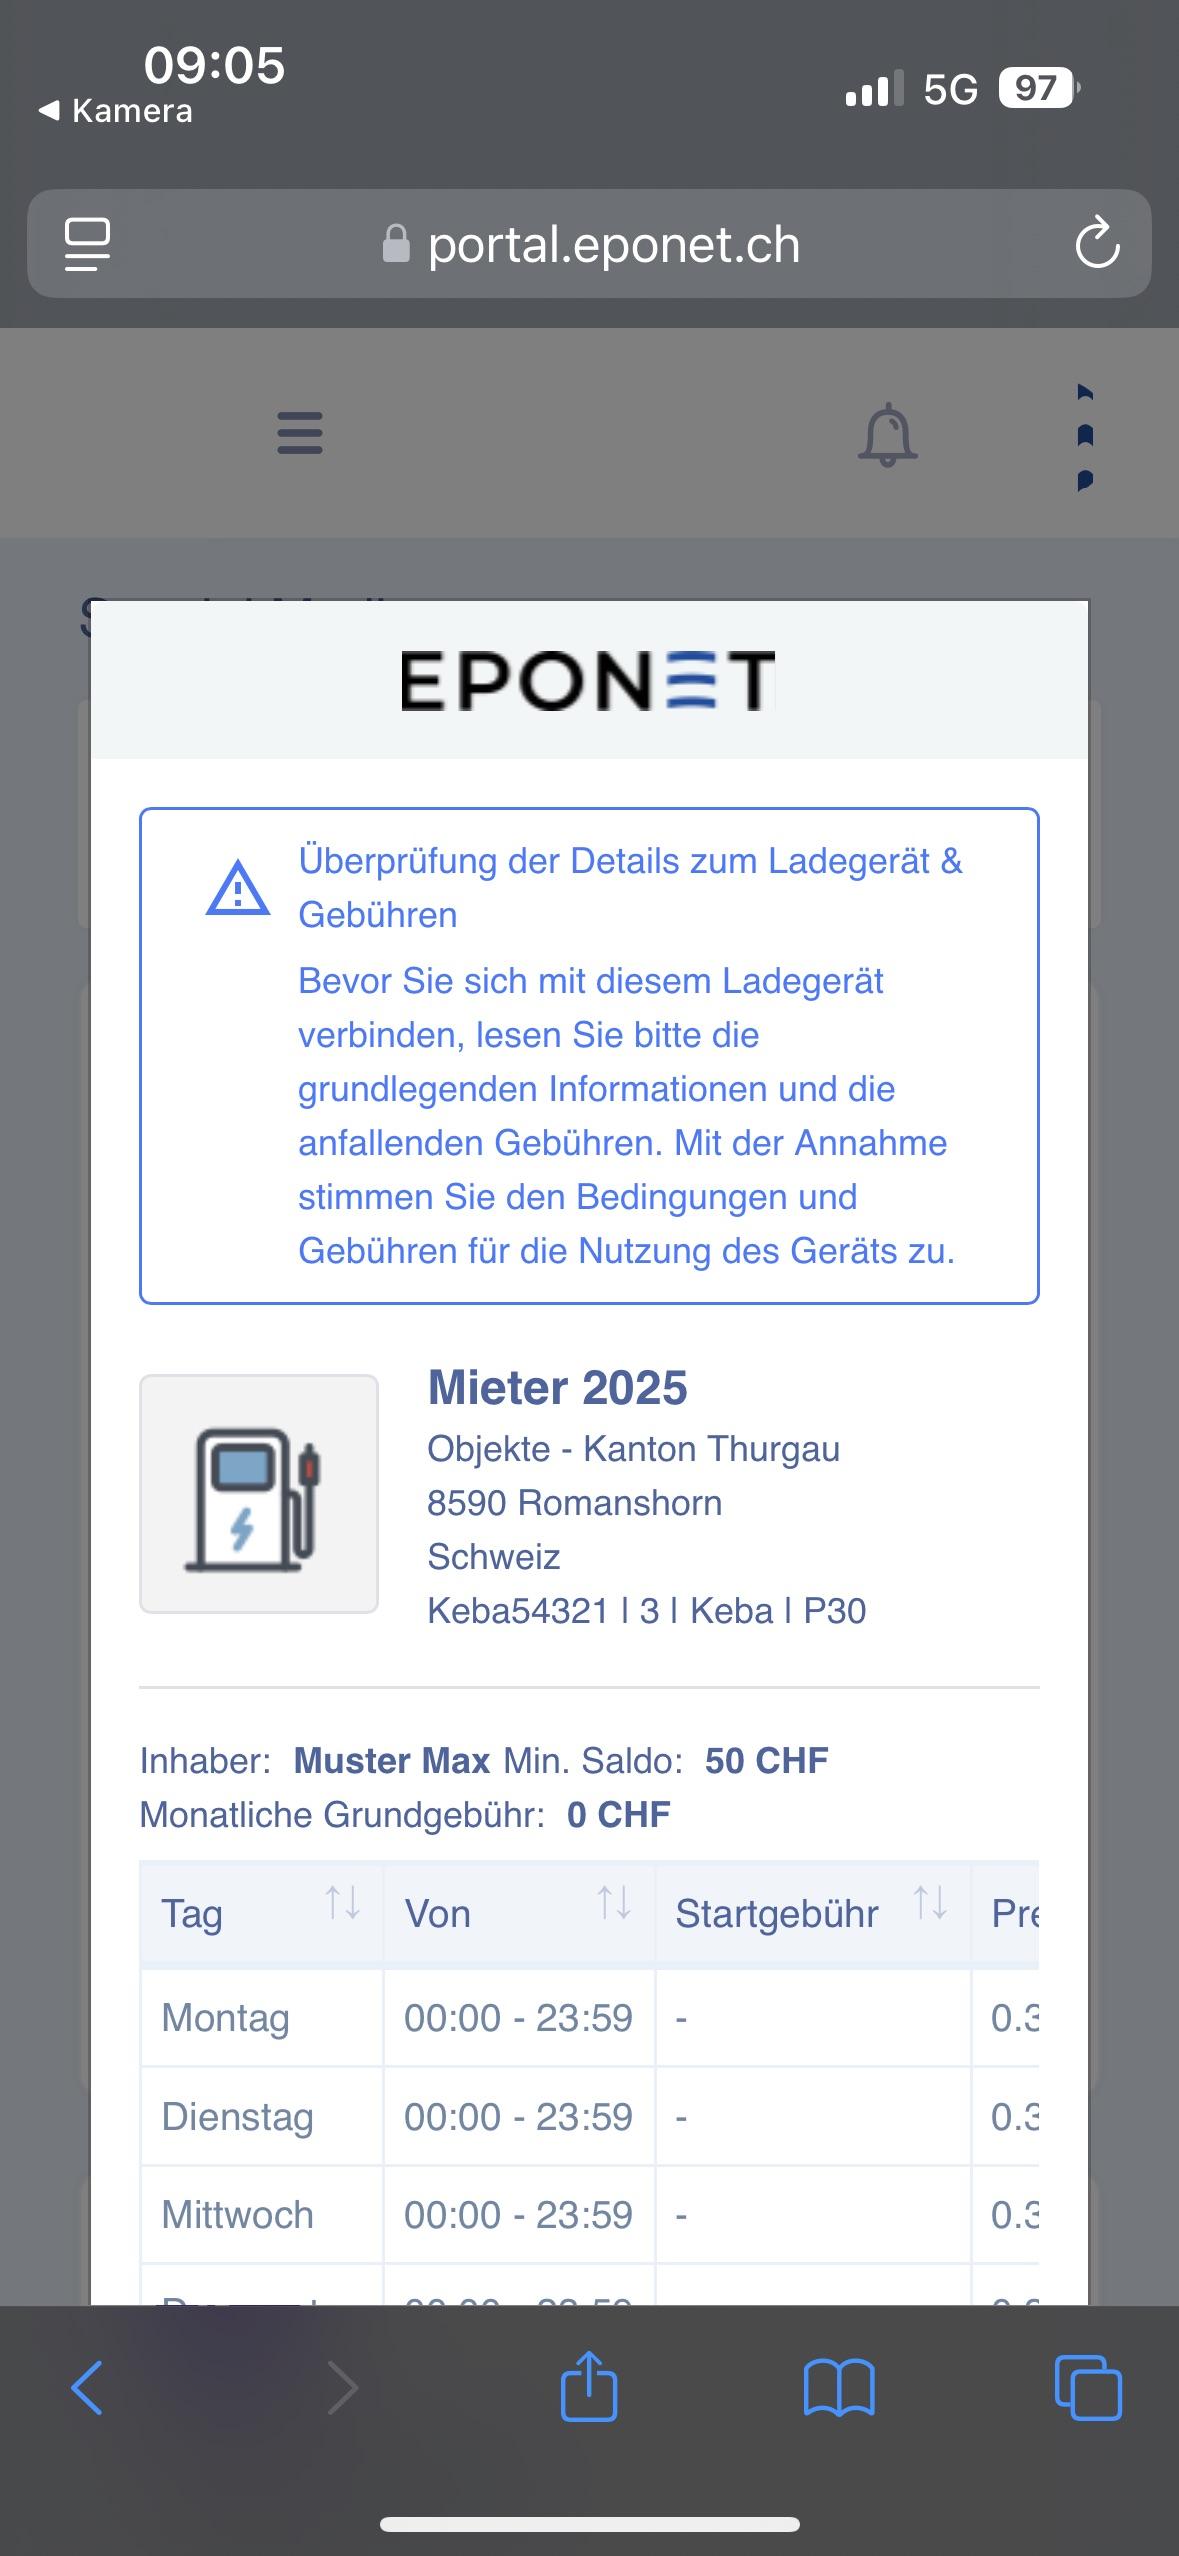](https://wiki.eponet.ch/uploads/images/gallery/2025-11/img-2603.jpeg) Scroll all the way down and click on "Approved & Connect" to rent the charging station. [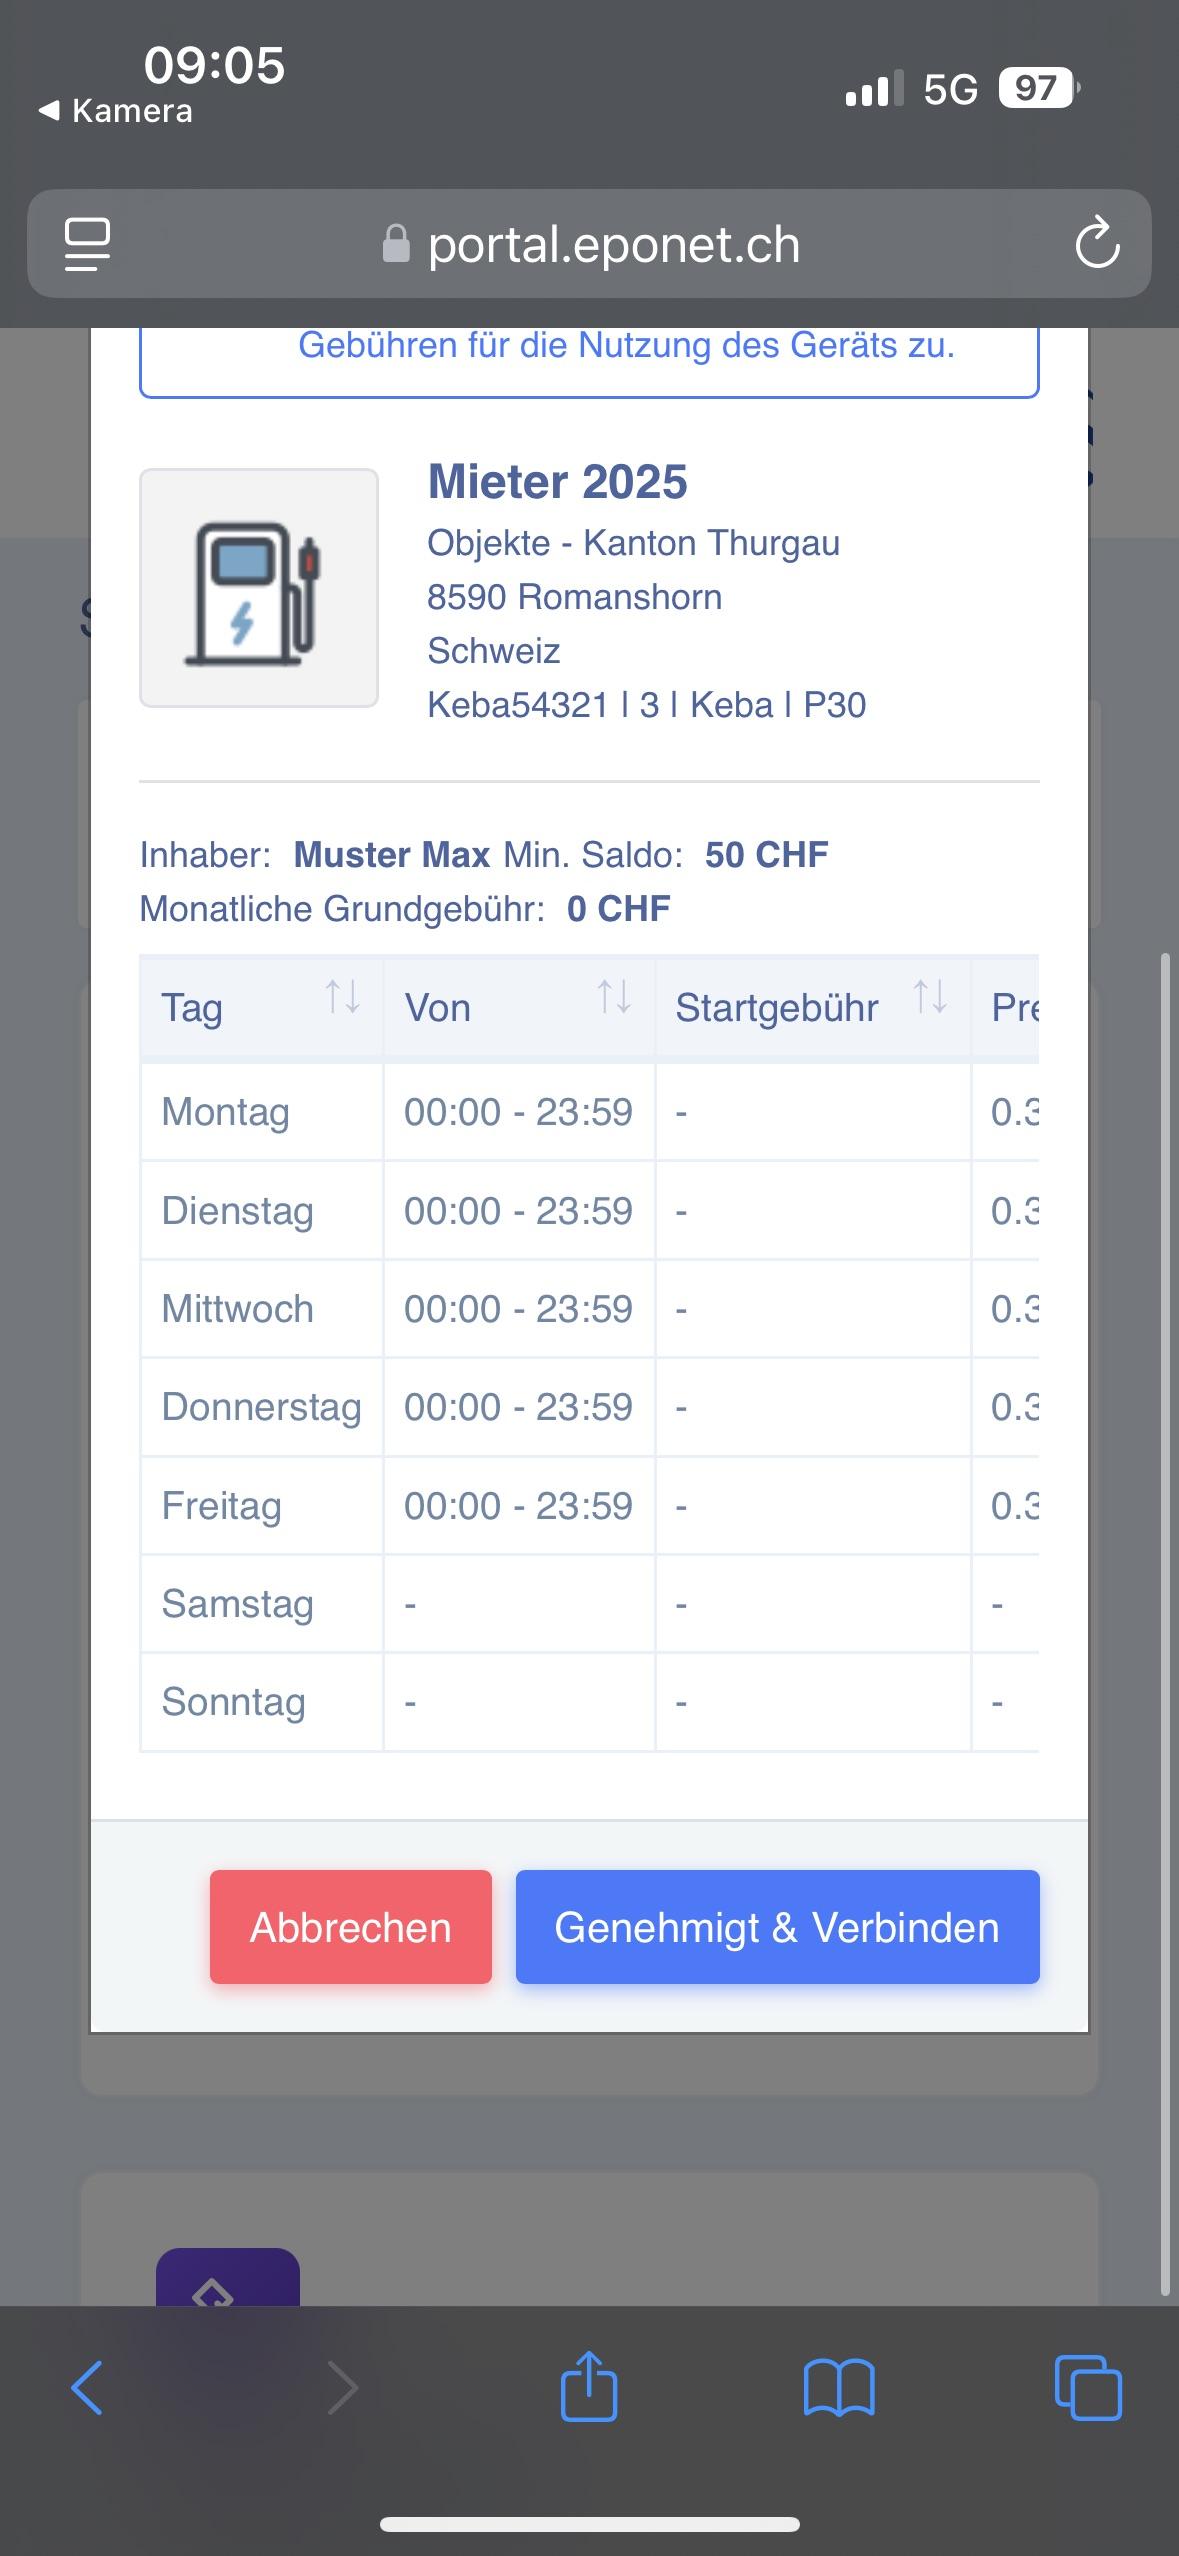](https://wiki.eponet.ch/uploads/images/gallery/2025-11/img-2604.jpeg) You have now successfully requested the charging station. The administration can now review your request and accept it if appropriate. [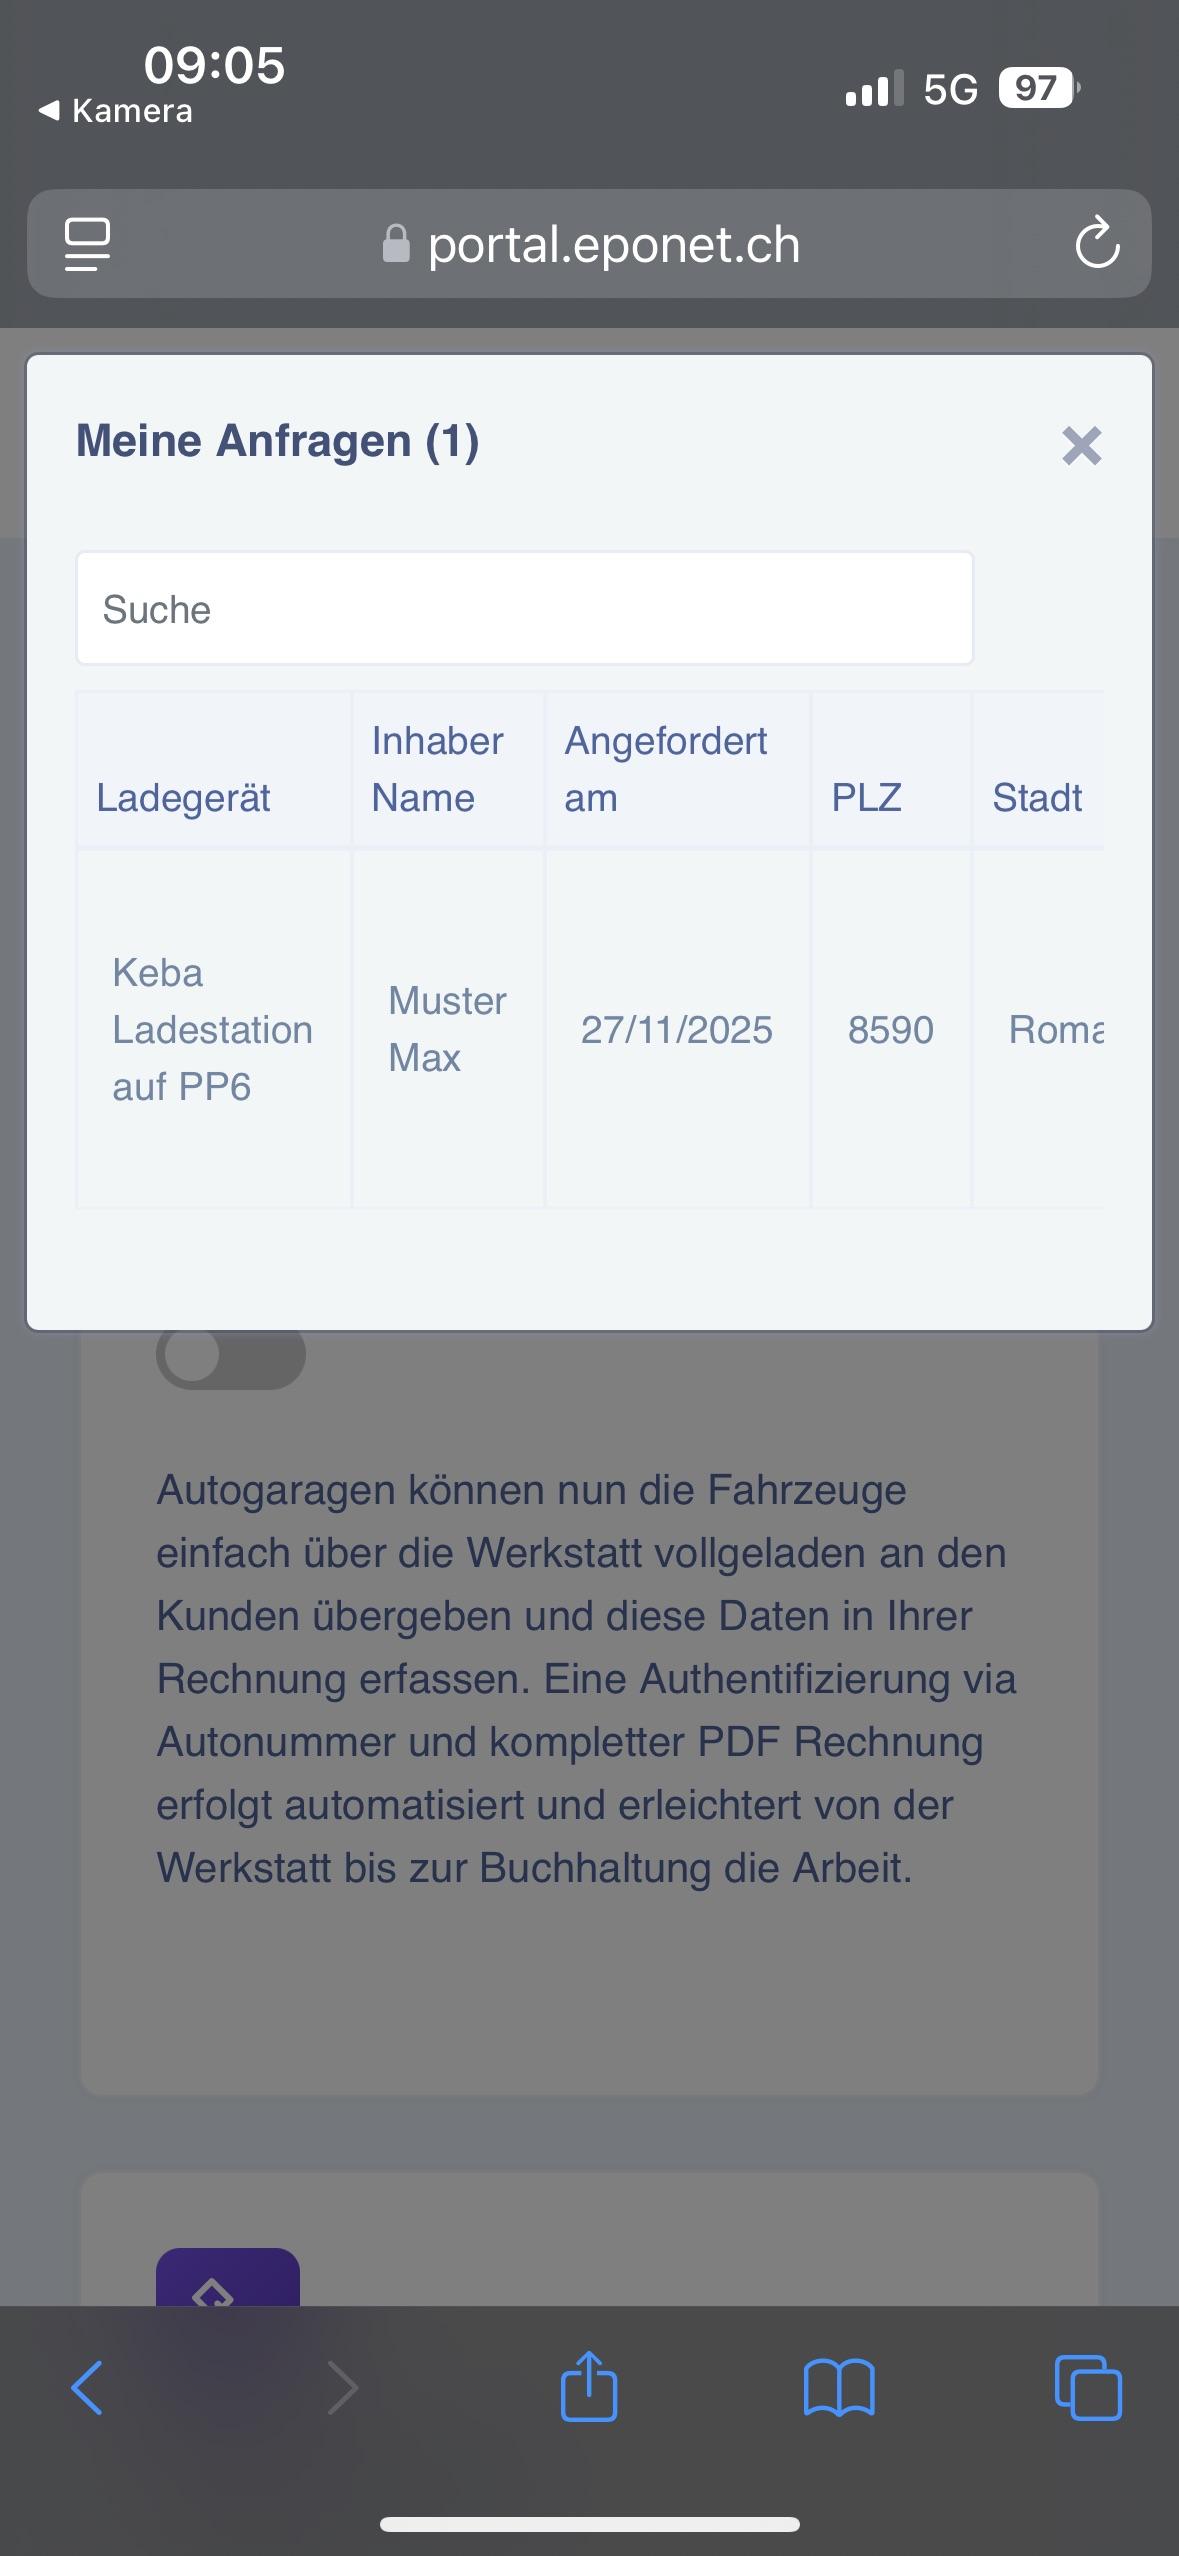](https://wiki.eponet.ch/uploads/images/gallery/2025-11/img-2605.jpeg) Once the rental request has been confirmed by the administration, you can view the charging stations you have rented on the Eponet app under the "ImmoConnect" tab. [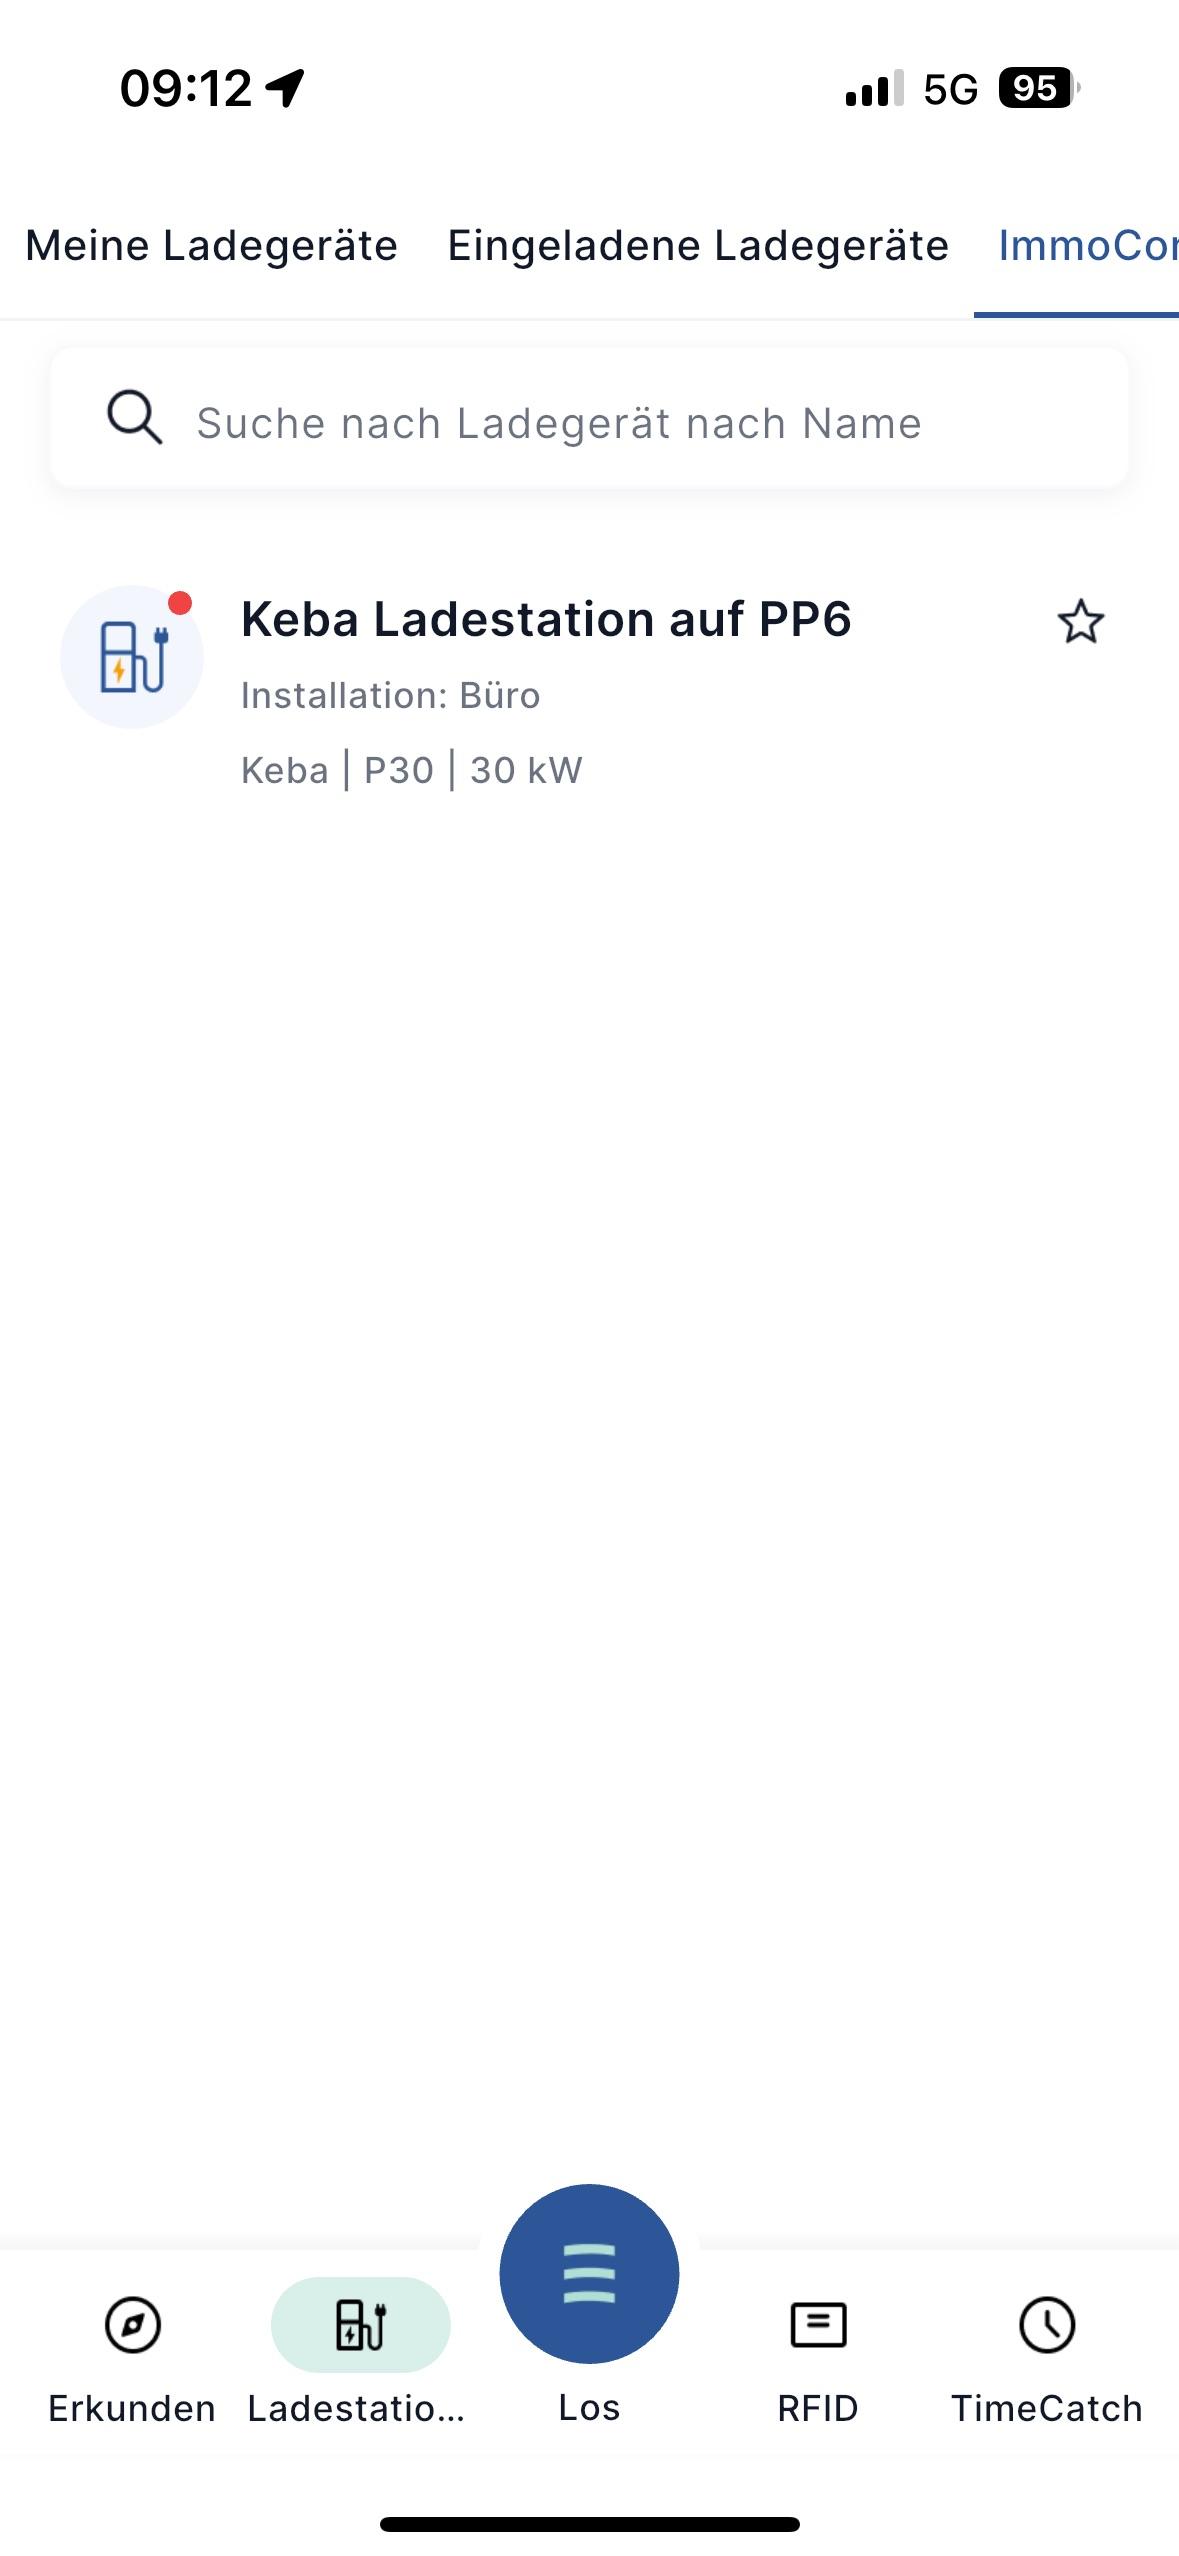](https://wiki.eponet.ch/uploads/images/gallery/2025-11/img-2607.jpeg) From this point on, you can charge your vehicle at this charging station. # Subscription Plans ImmoConnect offers different subscription plans that allow charger owners to connect and manage their charging infrastructure. Users can choose between **Light, Custom, and EVU plans**, each providing different features and capabilities. The **Light plan** allows basic charger connection but does not include invoice management. The **Custom plan** includes additional features such as **invoice creation and tenant billing management**. Users can easily **upgrade or change their subscription plan** from the *My Subscription* section, where current plan details and pricing are displayed. Any plan change is applied **immediately and reflected in the subscription details page**. There are 3 different plans - Light - Custom - EVU  - **Light Plan -** In this plan, the charging station owner can immoConnect their chargers but will not be able to create or use invoice features.  You can upgrade or downgrade your plan anytime you wish, and all the changes will be reflected immediately To upgrade or change the plan, simply click on the Upgrade Now button or click on My Subscription tab. It will redirect to My Subscription tab where all the details like current plan, price and date will be visible with a Change plan button at the right top corner. When you click on Change Plan button will open a popup with all the available plans with their details  Once click on the Select Plan button, new plan will be selected and you will see the success popup and it will redirect to the Subscription page, where all the details of the new plan will be visible.  - **Custom Plan -** In this plan, Invoices is an additional feature in which you can manage all the billing and details of your tenants.  - **EVU Plan -**The ImmoConnect EVU product offers you the opportunity to provide the infrastructure, i.e. to install the charging points. You can then hand over the operation of the infrastructure to Eponet.  # ImmoConnect Invoices ImmoConnect allows users to create and manage invoices for tenants directly within the platform. Two types of invoices can be created: **One-time invoices** and **Recurring invoices**, depending on the billing requirement. Users can create invoices from the **Create Invoice** button, where they can select tenants, define the invoice amount, choose the invoice type (Debit or Credit), and set a due date. One-time invoices can be created for **single or multiple tenants**, while recurring invoices automatically apply to **all tenants** and repeat based on the defined schedule. When multiple tenants are selected, the total invoice amount is **distributed equally**, but it can be adjusted before confirmation. All created invoices are visible in **Invoice History**, and recurring invoices are additionally listed in the **Recurring Invoice List** for easy management. 2 different types of invoices can be created - One-time invoice - Recurring Invoice.  To create an invoice, click on “Create invoice” button and it will open a pop-up with all the tenants and the number of chargers they have **Note:** Both types of invoices can be created from the same pop-up, but only 1 at a time.  To create a one-time invoice - - Select tenant (One or Multiple) - Enter the invoice amount - Select type (Debit or Credit) - Select due date - Upload file for reference (Optional) - Add Notes for reference (Optional) - Click on Next button at the bottom. **Note:** Do not select the checkbox if you want to create a one-time invoice only.  Also If you select multiple tenants, the entered amount will be divided equally for every tenant, but you can adjust the amount on the second page (before confirming the invoice) To adjust the amount, click on the amount field and edit it.  For every tenant invoice will be visible separately (Even when select multiple tenants at the same time)  To create a recurring invoice - - Enter the invoice amount - Select type (Debit or Credit) - Select due date - Upload file for reference (Optional) - Add Notes for reference (Optional) - Select the checkbox - Click on Next button at the bottom.  Once the checkbox is selected, all the tenants will get selected automatically, and you can not remove or unselect any tenant. The total amount will be equally divided among all the current and upcoming tenants, which means if new tenants join and or tenant left, the invoice amount will be automatically updated from the next due date. Once a recurring invoice is created, it will be visible in Invoice History (same as one-time invoice) for every tenant as well as in the Recurring Invoice List tab.   You can check the recurring invoice details by clicking on the eye icon.  # Delete ImmoConnect Invoices ImmoConnect allows charger owners to **delete invoices when they are no longer required**, depending on the invoice type and situation. Users can delete **one-time invoices** directly from the invoice list, either for a **single tenant or for all related invoices** if multiple tenants were included during creation. For **recurring invoices**, users have multiple deletion options such as deleting **only the current invoice**, **removing the invoice for specific tenants**, or **stopping all future recurring invoices**. These options allow flexible management of recurring billing without affecting other tenants unnecessarily. Invoices can also be deleted directly from the **Recurring Invoice List**, which will remove the current invoice and stop future recurring invoices. Note that **invoices can only be deleted when their status is Pending; once an invoice is Paid, it cannot be deleted**. To delete one-time invoice, click on the delete icon 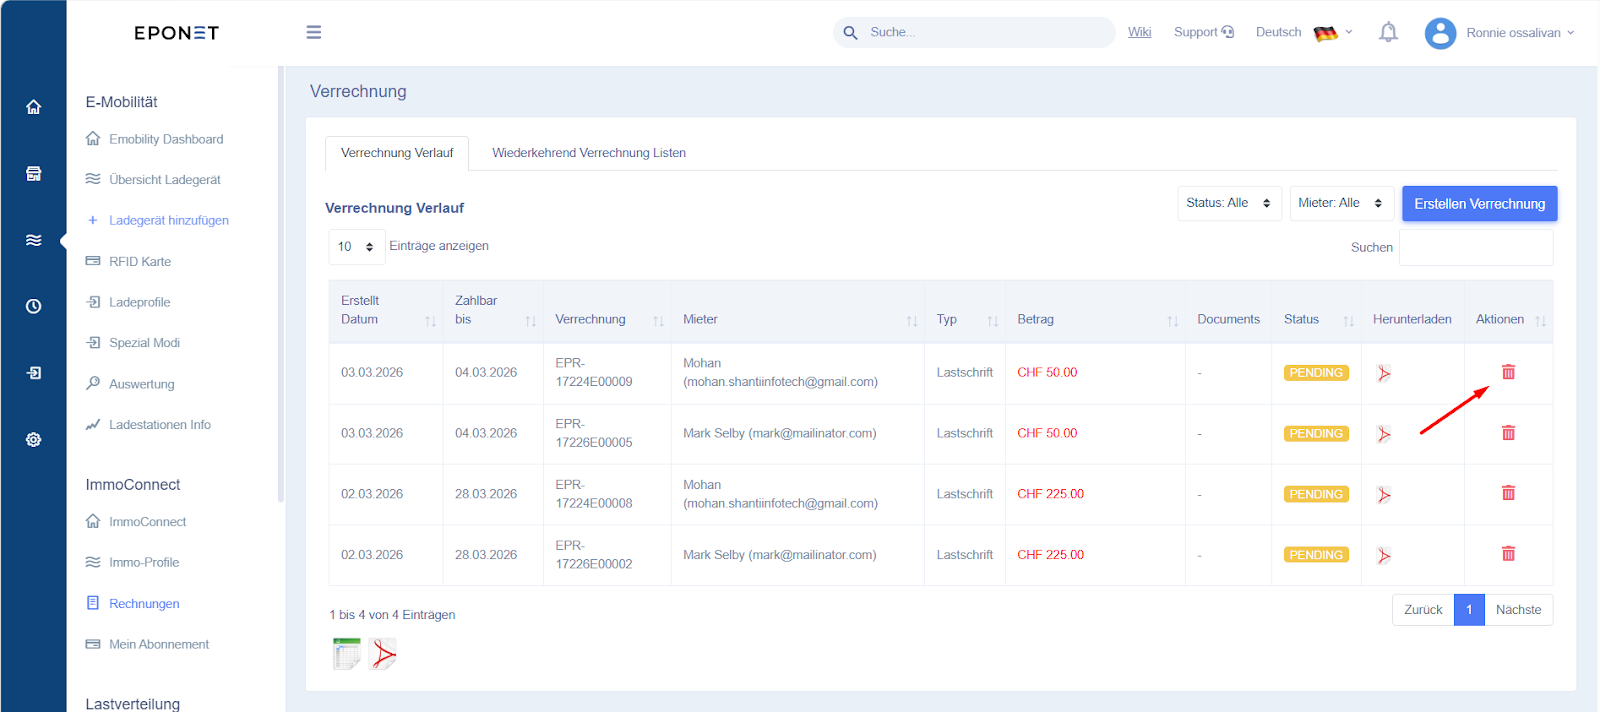 When only 1 tenant was selected during the creation, Charging station owner will get only one option: “Delete this invoice only” Only the selected invoices will be deleted; no other invoices will be affected. 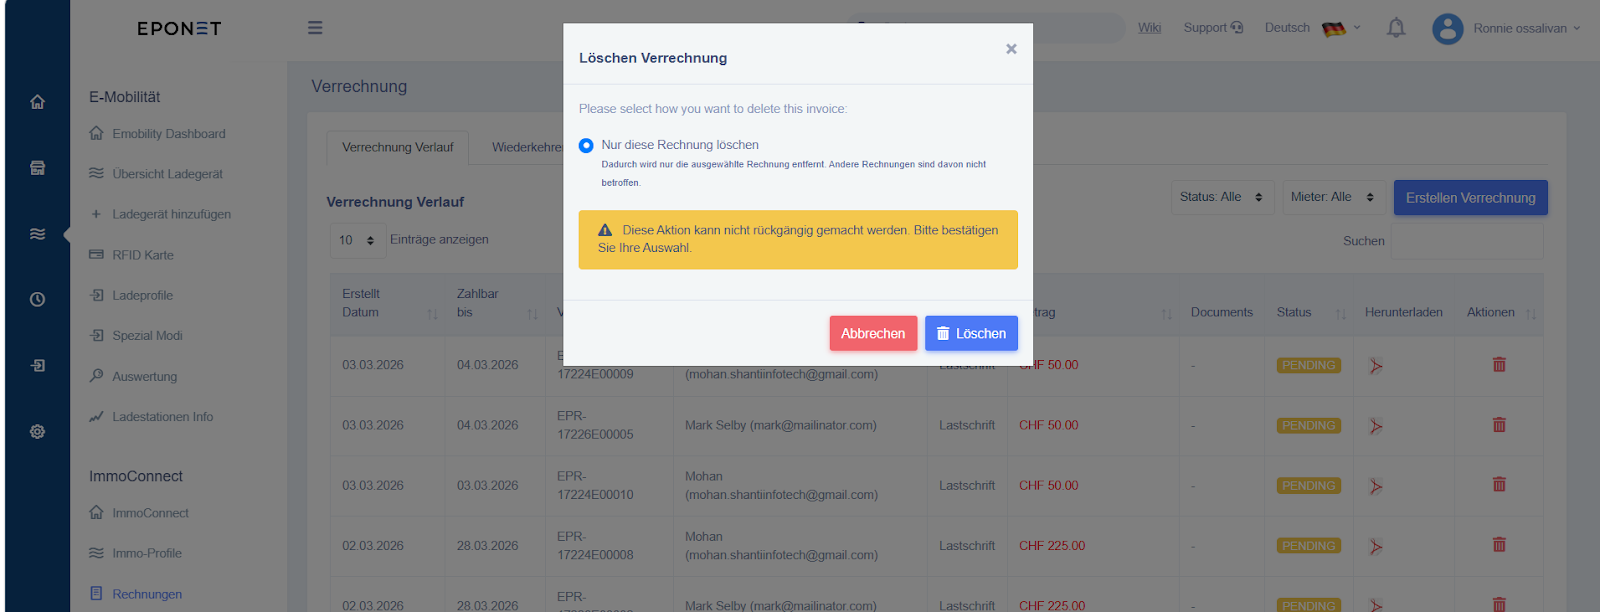 When it is a one-time invoice but multiple tenants were selected during the creation, the owner will get 2 options 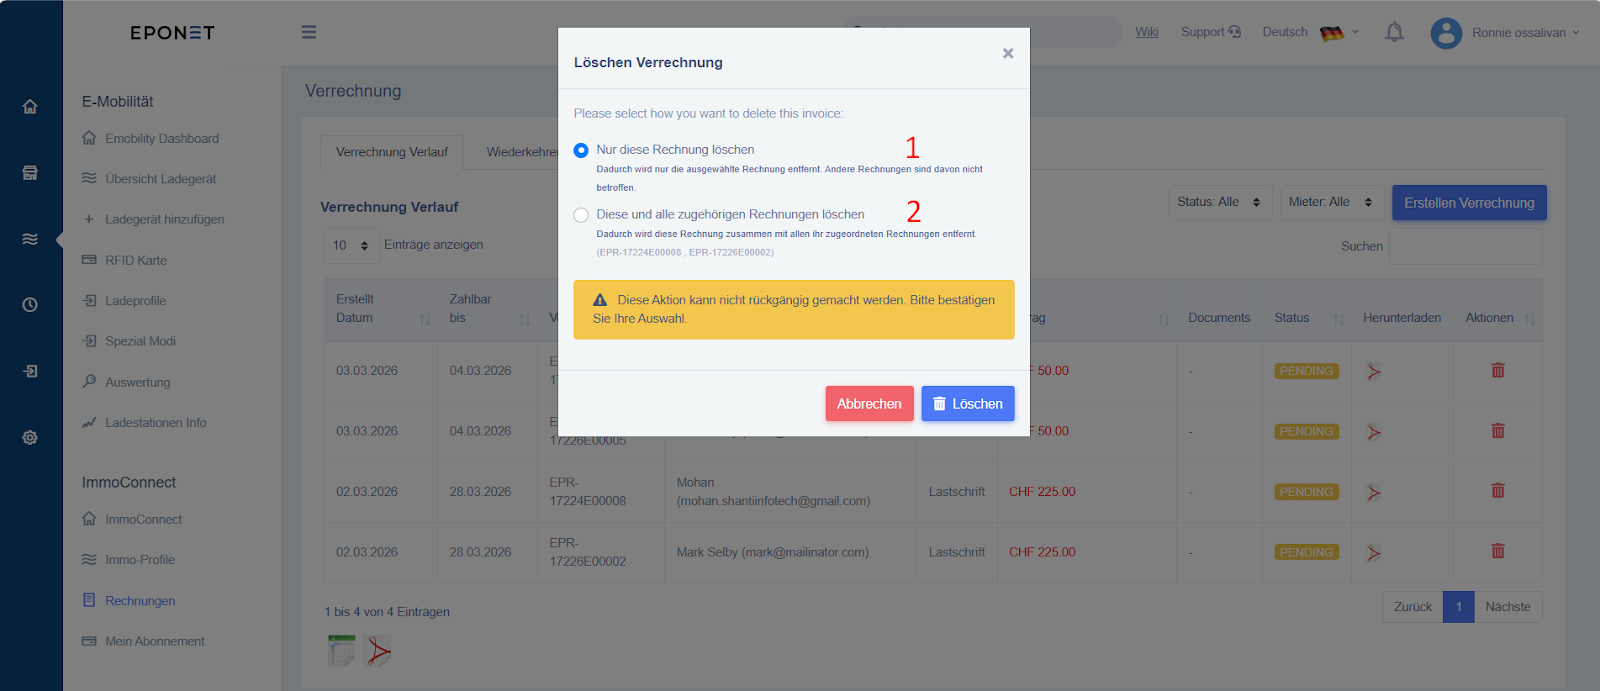 - Delete this invoice only - Delete this and all associated invoices When select option 1, “Delete this invoice only” - This will remove only the selected invoice. No other invoices will be affected by this. When select option 2, “Delete this and all associated invoices” - This will remove the selected invoice along with all invoices created with this one.. For recurring invoices delete, the owner will get 3 different options - - Delete This Invoice Only - Delete this invoice and the current recurring event - Delete this invoice and all future recurring invoices 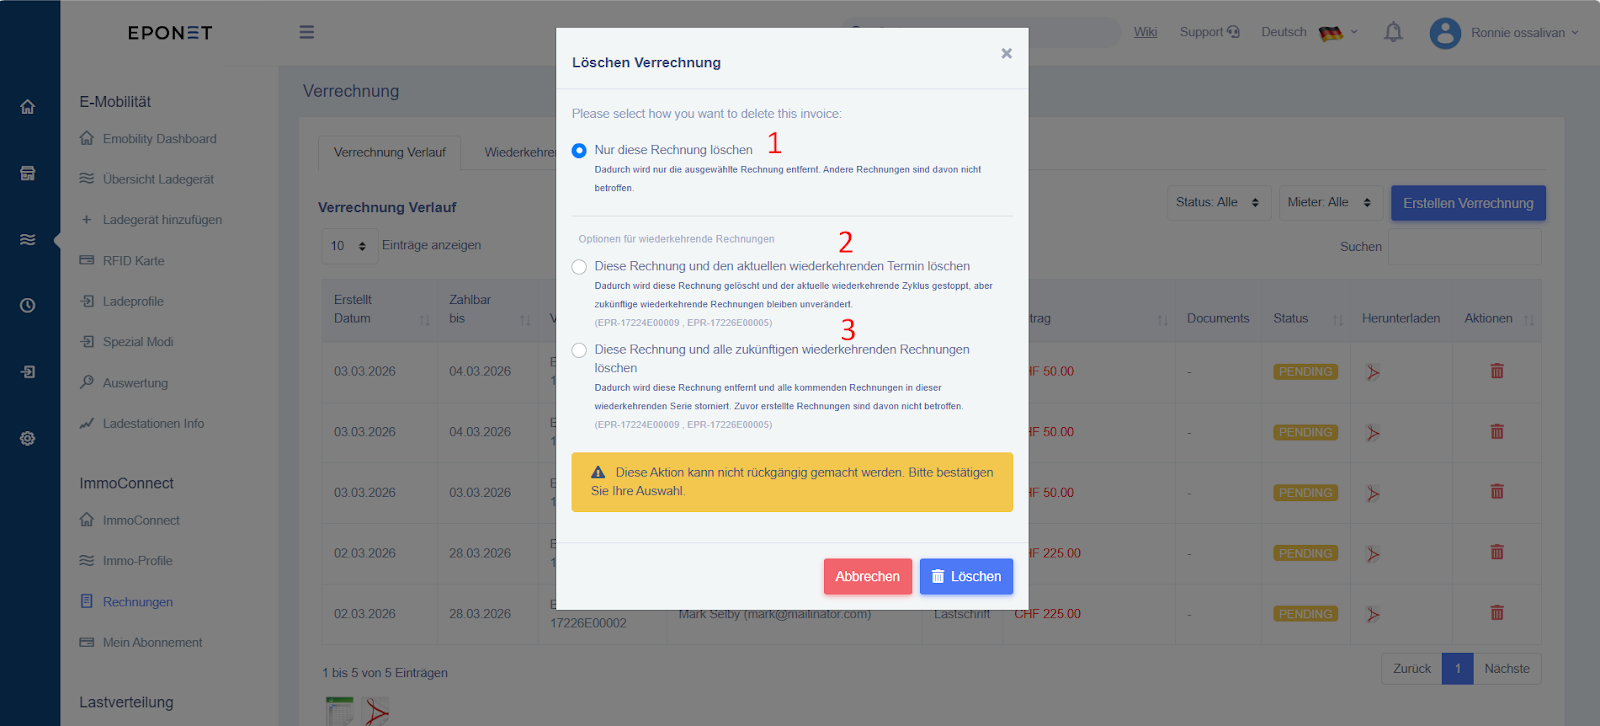 1\. Delete This Invoice Only - It will delete the selected invoice only for the current month, and as it is a recurring invoice, next month it will get created automatically with the amount based on tenants. 2\. Delete this invoice and current recurring event - This will allow you to delete the invoice for the specific tenants, When you select this option, it will expand a list of all the tenants (for which invoices are created). You can select one or more tenants at the same time. With this option, it will only delete the invoice for the current month, and from next month, the invoice will get created automatically. **Note :** You can also check the invoice numbers mentioned with this option, which will be deleted. 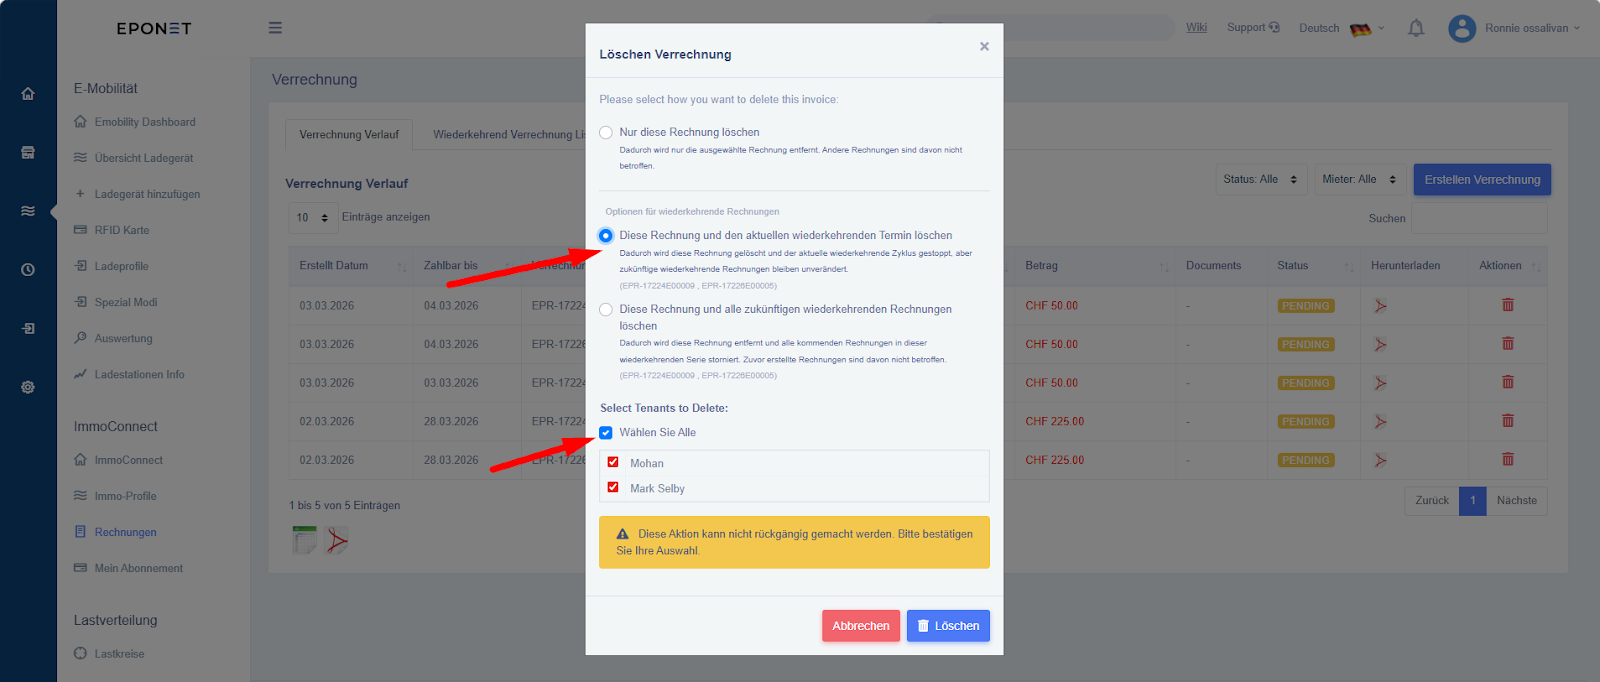 3\. Delete this invoice and all future recurring invoices - This will allow you to delete the invoice for the specific tenants, When you select this option, it will expand a list of all the tenants (for which invoices are created). You can select one or more tenants at the same time. With this option, it will delete the invoice for the current month, and it will also stop the recurring invoices for upcoming months. 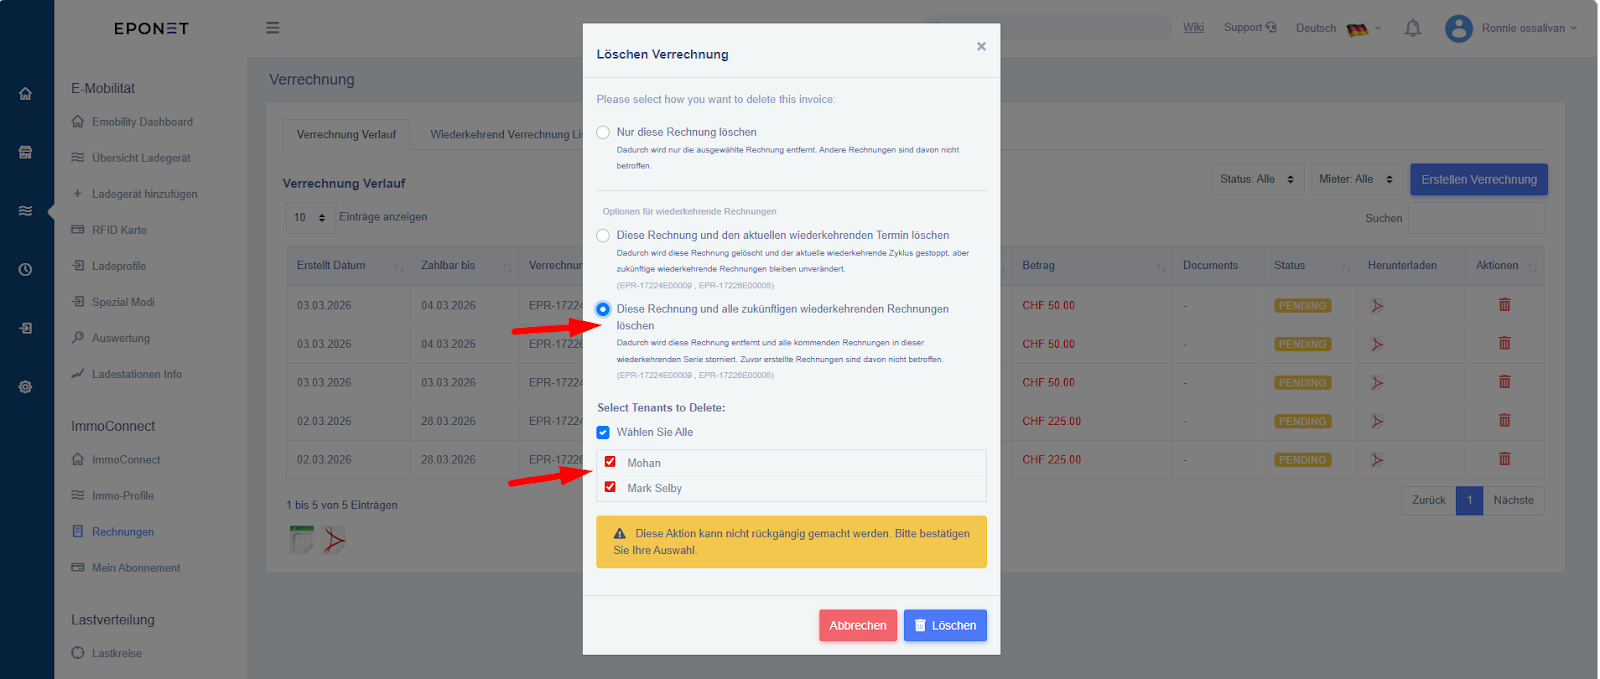 **Note:** For any of the options above, Delete invoice will only work when the invoice status is Pending, Once it is Paid, the invoice can not be deleted. To delete Invoice from Recurring List - Move to the recurring invoice list tab and click on delete icon 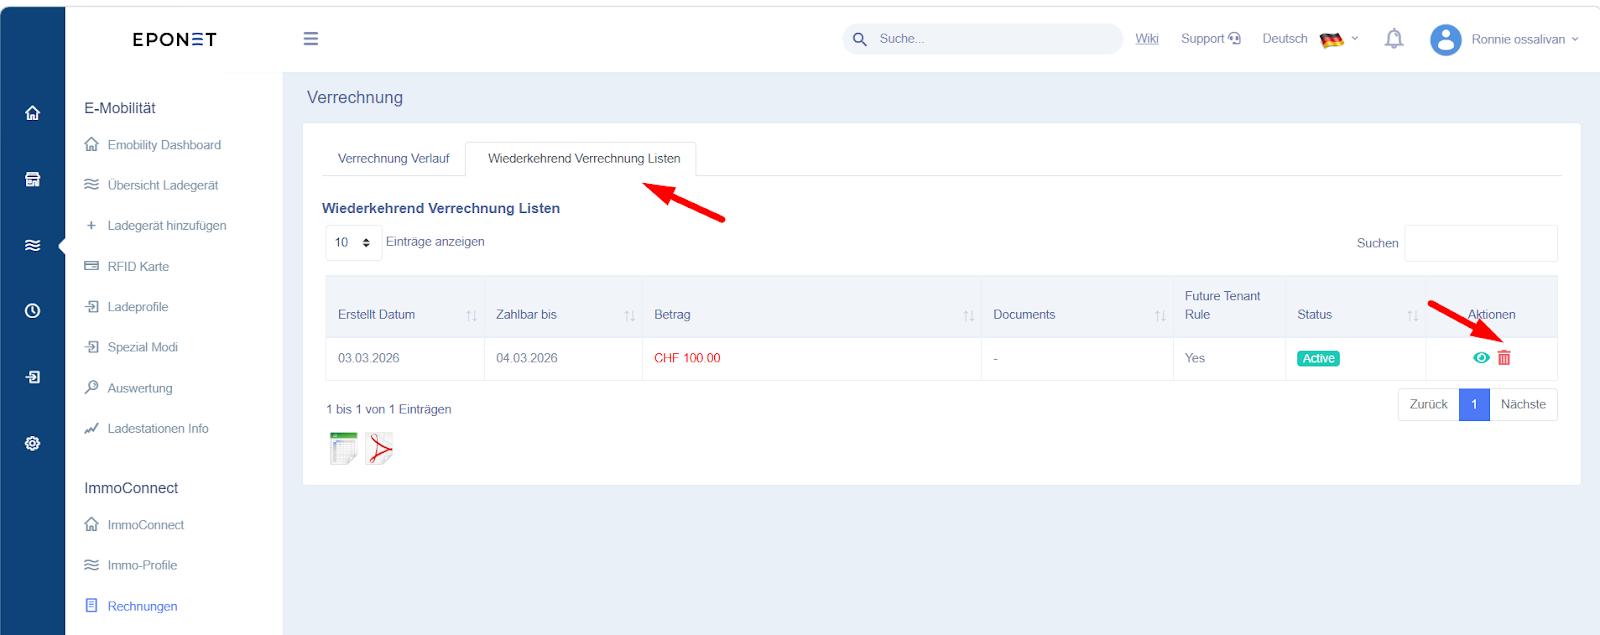 When deleting an invoice from here, it will stop the recurring invoices for all the associated tenants, and also the current month invoice will be deleted and removed from the Invoice list. 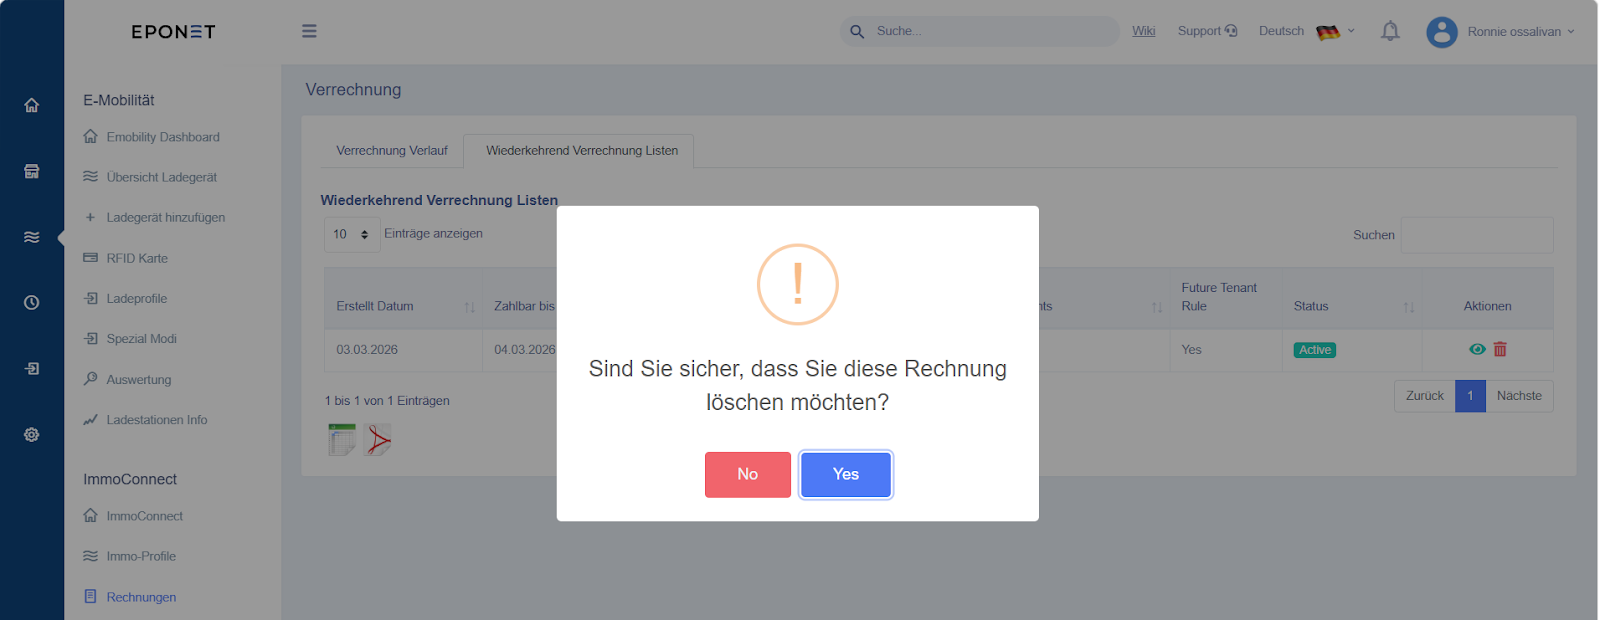 # Setting / Options 1 The **ImmoConnect page** provides an overview of all chargers connected to the ImmoConnect system and allows owners to manage tenants and charger assignments. Users can **search and filter chargers by tenant name or charger name**, and remove chargers from ImmoConnect when no tenant is assigned. The **Charger Details page** displays important information such as tenant name, connection date, profile settings, and tenant history, and also allows owners to **end a tenant contract for a selected month**. The **My Tenants tab** shows all tenants along with their assigned charging stations and accounting details, including invoiced amount, paid amount, and outstanding balance. The **Requests section** allows owners to review and approve or decline tenant requests for charging stations. Additionally, the **White Label tab** allows users to upload a custom logo and terms of use to personalize the ImmoConnect interface. ImmoConnect Page - All the chargers will be displayed here. - Owner can search by tenant name - Filter by tenant name. - Delete charger (Remove from immoconnect) - Search by charger name Chargers that are ready for immo connect will be grayed out.  Chargers on which tenants are assigned can not be deleted, so the delete icon will be hidden in this case. Charger Details contains all the details, including tenant name, connected date, Change profile option, and tenant history, along with End contract option.  To End contract, click on "End contract" text, select a month from the calendar, and click on "Yes, End contract" button. The contract will end, and the tenant will be removed on the last day of the selected month.  My Tenants tab shows all your tenants with the specific charging stations and accounting details.  Accounting will shows all the listing of invoices with updated status and - Invoiced Amount - Total amount for which invoice has been created till now (for this tenant) - Amount Paid - Amount paid by user (Based on Paid status from invoice) - Balance - Amount yet to be paid by the tenant for pending invoices  Requests tab -> Tenant Requests shows all the tenant requests with their basic details, their status, and action to Approve or Decline.  Note: If a charging station has multiple pending tenant requests, once you approve any 1 request, all the other pending requests for that charging station will be automatically cancelled. My Requests - contains all your requests (that you have made for anyone’s immo charging station.) with the updated status  White Label - To add these details, Move to White label tab, Add Logo, Upload terms document, of Use and Add Terms of Use, click on Save button.  Note: All the fields are are optional, and if you do not upload any logo, default Eponet logo will be visible.